

I've been using Bytemark for a while now, both personally and professionally, and one thing that has got me excited recently is running GuixSD on Bytemark VMs.
A while back, I installed GuixSD on a Bytemark VM first by creating a VM on Bytemark using Debian as the operating system, then installing Guix within Debian, then using that installation of Guix to install GuixSD over the top of Debian.

This "over the top" approach works surprisingly well, you just have to remove a few key files from Debian before rebooting, to ensure GuixSD is able to boot. It does have several disadvantages though, its quite slow to install GuixSD this way, and you have to manually clean out the Debian related files.
Bytemark do support inserting ISO images in to the VMs, which can be used to install operating systems. Up until recently, Guix didn't have an ISO installer, but now, with the 0.14.0 release, there is one available.
In case you're interested, here is a quick description of what this involves. You might want to follow along with the full system installation documentation at the same time.
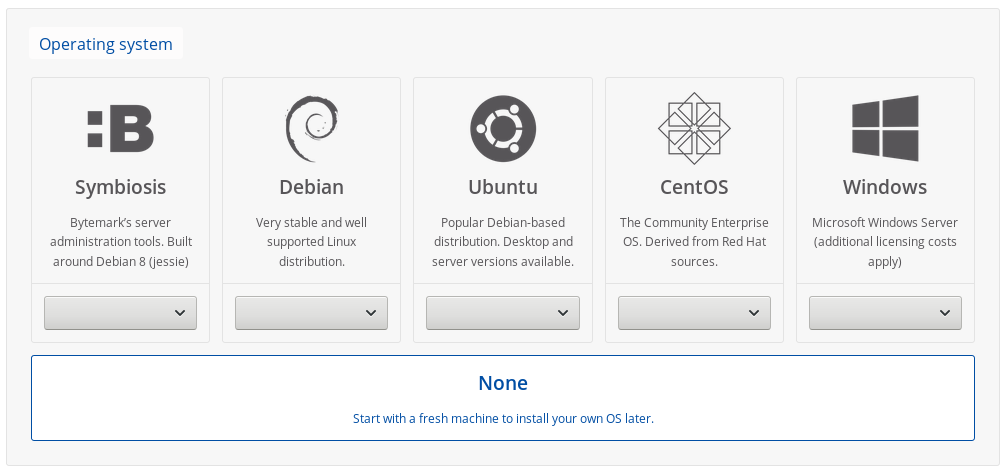
Step 1: Create a new cloud server
I selected mostly the defaults: 1 core, 1 GiB of RAM, 25 GiB of SSD storage. For installing GuixSD, select None for the operating system.
Step 2: Insert the GuixSD installer ISO
Open up the server details, and click the yellow "Insert CD" button on the left.
Pop in a URL for the installation image. It needs to be decompressed, unlike the image you can download from the Guix website.
To make this easier, I've provided a link to a decompressed image below. Obviously using this involves trusting me, so you might want to decompress the image yourself and upload it somewhere.
https://www.cbaines.net/posts/bytemark_server_with_guixsd/guixsd-install-0.14.0.x86_64-linux.iso
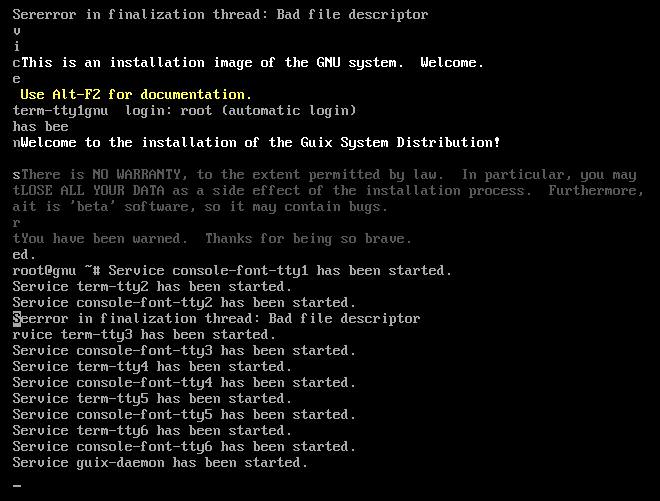
Step 3: Boot in to the installer
After that is done, click the VNC button for the server to the top right, and once the window for that opens up, click the red "Ctrl + Alt + Delete" button to trigger the system to restart. This should get it to boot in to the installation image.
Step 4: Setup networking
Run the following commands to bring up the network interface, and get an IP address.
ifconfig eth0 up
dhclient eth0
Step 5: (Optional) Start the SSH daemon
If you're happy using the web based console, the you can continue doing that. However, the installer includes a ssh-daemon service which can be used to continue the installation process over SSH.
If you want to use this, use the passwd command to set a password for the root user, and then start the ssh-daemon service.
passwd
herd start ssh-daemon
After doing this, you can find out the IP address, either from the Bytemark panel, or by running:
ip addr
Once you have the IP address, login to the machine through SSH and continue with the installation process.
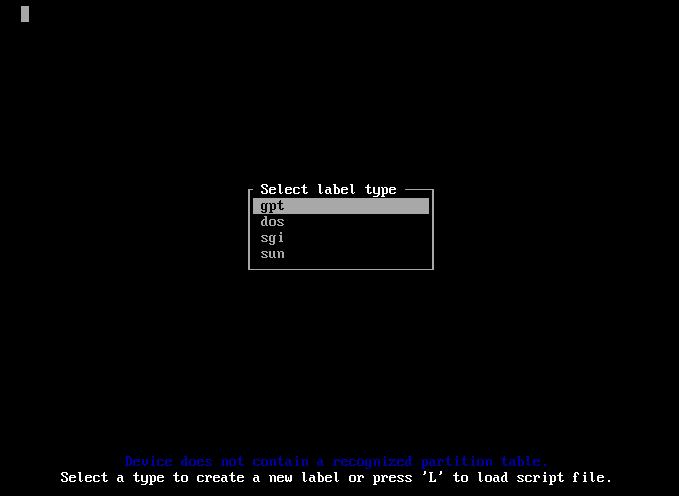
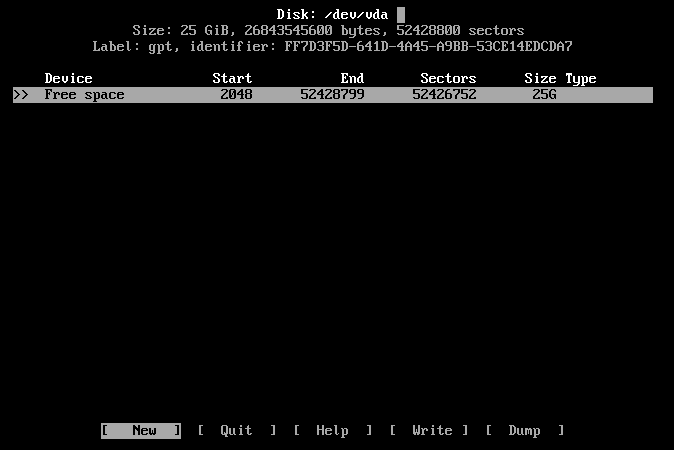
Step 6: Partition the disk
Select the default partitioning type, gpt.
Create a "2M" BIOS Boot partition, and then a 25GB Linux filesystem.
After that select the "[ Write ]" option, and then the "[ Quit ]" option.

Step 7: Create and mount the root filesystem
mkfs.ext4 -L root /dev/vda1
mount LABEL=root /mnt
Step 8: Write the configuration
mkdir /mnt/etc
cp /etc/configuration/bare-bones.scm /mnt/etc/config.scm
I then edited this file with nano, mostly as using zile with C-n for move down kept opening new browser windows.
- Changed the hostname and timezone
- Set the bootloader target to "/dev/vda"
- Changed the filesystem device to root
- Set the name of the user
- Change the home directory
Step 9: Start the cow-store service
herd start cow-store /mnt
Step 10: Run guix system init
I did have some problems at this point, as the VM appeared to reboot. I tried again, but this time with the --no-grafts option, and it worked. If you encounter something similar, try adding the --no-grafts option to guix system init, and I'd also be interested to know.
guix system init /mnt/etc/config.scm /mnt
...
Installation finished. No error reported.
If this works succesfully, you should see the above message at the end.
Finish: Reboot in to GuixSD
Reboot, and then remove the CD from the system using the Bytemark panel.
reboot
If you run in to any trouble, there is a IRC channel (#guix on Freenode) and a mailing list where you can ask for help.
Also, while this guide may go out of date, if you do have any suggestions or corrections, you can email me about them.